Welcome to the DFO World Wiki. With many major updates since the release of DFO, many items are missing. Visit Item Database Project to learn more.
Please remember to click "show preview" before saving the page.
Thanks for the updated logo snafuPop!
Ozma of Chaos
| This part of the current article contains spoilers. |
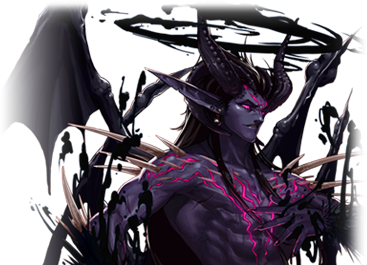
| Ozma of Chaos | |
|---|---|

| |
| Age | 42 (at the time of death) |
| Sex | Male |
| Race | Human (Former) Demon |
| Affiliation | Pell Los Empire (Former) The Imposter Legion |
| Occupation | Pell Los Empire Court Magician (Former) The God of Chaos The Eleventh Apostle (Korean: 第11使徒 Je Sib-il Sado) |
| Alias | Great Mage Ozma The Compass of the Empire, the Wise Guide The One Who Rose from Death / The One Who Resurrected (Korean: 죽음에서 일어난 者 Jugeumeseo Ireonan Ja) |
| Location | Dark Side |
| Foreign Name(s) | ExpandKorean Ver.:
ExpandChinese Ver.:
ExpandJapanese Ver.:
|
| Likeability | N/A |
| “ | Khazan... Will you become the God of Destruction? Then I will become the God of Chaos. | ” |
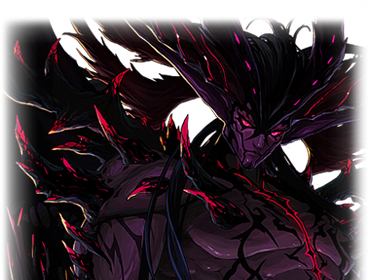
Ozma of Chaos (Korean: 혼돈의 오즈마 Hondone Ojeuma), also known as the God of Chaos (Korean: 혼돈의 신 Hondone Sin), is an enemy character and secondary antagonist from Dungeon Fighter Online (DFO) and Dungeon & Fighter Mobile (DNFM). In DFO, he originally served as the final boss for the now unavailable Otherverse dungeon Dark Side, and currently acts as primary antagonist of the Black Order Resurgence Arc and the final boss for the Otherworldly Dark Side dungeon Throne of Chaos. In DNFM's version of Ozma Raid, he appears with three phase variations: an angelic version known as Ozma of Creation (Korean: 창조의 오즈마 Changjoe Ojeuma), an apocalyptic version known as Ozma of the End (Korean: 종말의 오즈마 Jongmare Ojeuma), and a void version known as Ozma of Nothingness (Korean: 무의 오즈마 Mue Ojeuma).
Originally a hero of the Pell Los Empire from 800 years ago, he was betrayed and sentenced to death by the very people he swore to protect. He made a deal with a Reaper that transformed him into a Demon, and waged a century-long war against mankind known as the Black Crusade, which nearly wiped out the human race from Arad over 600 years ago. He is responsible for the creation of the Imposters, the Curse of Blood, and the God of Destruction, the decline and fall of the Pell Los Empire, and the recent appearance of Demons on the Arad Continent as well as the indirect creation of the Priest Order, the Black Order, the Khazan Syndrome, the Avengers, and the Mistress Phenomenon.
According to Aradian history, he was once a human known as the Great Mage Ozma, a magical prodigy who was raised by the Elves and was once regarded as the greatest mage in the Pell Los Empire. Renown for many feats, his greatest was saving the Arad Continent with his friend Great General Khazan from the Dragon invasion led by the Berserk Dragon Hismar. However, after the then Pell Los Emperor framed him and Khazan for treason and sentenced them to death in an act of fear and jealousy, Ozma sold his own soul to a Reaper in exchange for the power to enact his revenge and to cleanse the world of the sins of humanity. After his execution, Ozma resurrected from death as a Demon, and with his newfound powers as the 'God of Chaos', he unleashed a plague upon the land which plunged Arad into an Age of Chaos and mustered a Demon army to eradicate mankind. During his conquest, he waged war against mankind's last alliance led by Michaela of the Holy Eye, which consisted of the forces of Pell Los, Suju, and the Priest Order, who ultimately defeated him and sealed him away along with his army and the entirety of Dark Side within another dimension.
Although, Ozma remains sealed for now, his presence still lingers: Imposters continue to roam the continent and signs of his seal weakening and of his resurrection become more evident with every subsequent Metastasis as increasingly more Demons arrive from the other world. It seems while trapped, Ozma still continues his campaign to eradicate mankind, readying a new army of Imposters to wage another Crusade against Arad when he escapes from his dimensional prison.
Prior to the Great Metastasis Update, Ozma initially appeared as the final enemy of Dark Side during the Priest Order's investigation of the Otherverse in the Epic Quests Once More Into the Breach, where he was revealed to be the Eleventh Apostle (Korean: 제11사도 Je Sib-il Sado) of Pandemonium, also known as The One Who Rose from Death (Korean: 죽음에서 일어난 자 Jugeumeseo Ireonan Ja). However, after the Origin Update, this reveal was changed to an unspecified time after his imprisonment and prior to the canonization of Saint Michaela as an Apostle, and his reappearance would be at the finale of the Black Order Resurgence Arc.
Contents
[hide]History

More than 800 years prior to the events of the story, Ozma was once known as the greatest wizard in the Pell Los Empire. In Arad Year 152, he and his friend, Pell Los General Khazan, saved the world by killing the empire's scourge, the Berserk Dragon Hismar, ending its fifty-two-year long reign of terror. The two individuals were regarded as national heroes and their strength helped bring the Pell Los Empire to the peak of its power.
However, as years passed, the Pell Los Emperor Pahlmerier I grew paranoid and wary of their fame, believing that their power would eventually supplant his own and cause him to be overthrown. It was during this time, a mysterious hooded individual arrived, and informed the Emperor of a prophecy which foretold the eminent destruction of the empire. In an attempt to avoid the prophecy, the Emperor orchestrated a conspiracy to get rid of both Ozma and Khazan, but in doing so, sealed the Empire's fate.
In Arad Year 157, the Emperor framed Khazan for treason and sent Ozma to pursue him. While the two fought each other and became weakened, the Emperor sent another group of soldiers to capture and subdue them. The two individuals were both framed for treason, imprisoned, and tortured. The Empire stripped Khazan of his strength by severing the tendons in his arms and robbed Ozma of his sight by putting out his eyes. Additionally, Khazan and Ozma's families were to be executed with the exception of Ozma's fiancée Reeze who was taken as the Emperor's noble consort.

While imprisoned alongside Khazan and awaiting execution, Ozma felt great betrayal for his services to the Empire and became disgusted upon seeing how quickly and easily the people were swayed into believing the Emperor's conspiracy. His thoughts ventured down a dark path. Thoughts of revenge on those who wrong them clouded his mind until it descended and evolved into the eradication of humankind. He sought to bring to the world the same sense of betrayal he experienced and let chaos reign supreme. But he had no way to do so...
It was during this desperate hour that Ozma was granted a vision and was visited by an emissary of death, a Reaper, who promised him the power he desired in exchange for his soul. At first, Ozma, still clinging to a sense of righteousness, turned down its offer, and attempted to drive the Reaper away. But as time passed, his desperation and insanity grew. Upon his execution, as he was cast into the southern sea to die, the reaper appeared before him again and Ozma accepted its proposal. It was then, the once great wizard Ozma had died, and had given way to the newly resurrected God of Chaos.

Upon his resurrection, Ozma searched for his old friend Khazan, and eventually found the exiled, disgraced general wandering aimlessly in the Stru Mountains barely clinging to life. Acknowledging their past friendship, Ozma released Khazan from his human form, transforming him into a Ghost, and offered him an opportunity to join his cause. But Khazan, having given up on humanity and revenge, refused his offer and the two parted ways. Khazan became the God of Destruction wandering aimlessly around the Arad Continent spreading his Khazan Syndrome while Ozma became the God of Chaos spreading his Curse of Blood and continued his pursuit to create his demon army to wipe out humanity.
One year later, creatures known as Imposters began showing up in Arad. These beings were former humans who fell victim to the Curse of Blood and were monsters that disguised themselves as humans with an insatiable bloodlust. Those who were attacked by Imposters also became Imposters. Because the Imposters were not distinguishable from normal people by the way they look, it created mistrust and witch hunts within the populace; descending the continent of Arad into chaos. Around Arad Year 211, a group of individuals known as priests began combating the growing number of Imposters and would eventually grow into a major organization. However, during these years, Ozma kept himself hidden as he amassed his army. It wouldn't be until Arad Year 252 when Ozma finally reappeared to lead his Imposter Legion and declare war on mankind.

One year later, Ozma and his Imposter Legion were challenged by a group now known as the Priest Order led by Michaela of the Holy Eye in an almost century-long struggle known as the Black Crusade. In Arad Year 347, Ozma's army became cornered in an area known as Dark Side, where he and his army were defeated and sealed in another dimension, ending the ninety-four-year war. But although Ozma had failed in his campaign to destroy humankind, he succeeded in getting revenge against his perpetrators and led to the fall and destruction of the once great Pell Los Empire.
While trapped, Ozma readied a new army of Imposters to wage another war upon Arad for when he would eventually escape from his dimensional prison. But he was not alone; trapped along with him was the Priest General, Michaela of the Holy Eye. The two individuals constantly clashed with one another for centuries, unable to kill each other.
Original Story Version
In Arad Year 993, the ongoing Metastasis phenomenon gradually eroded the boundaries between dimensions, causing the seal on his dimension prison to weaken. Taking advantage of this, Ozma began sending small portions of his army, Chaos Demons, through the Metastasis-created dimensional rifts back into Arad. As a result of the increased demon sightings across the continent, the Priest Order began a large-scale investigation of these rifts, believing it as a sign of Ozma's return.
Around Arad Year 1002, the Priest Order, while investigating the Chaos Demon phenomenon in a Interdimensional Rift left in Noire Ferra, discovered the demon stronghold Dark Side in the Otherverse. It was during this investigation, his longtime adversary, Michaela, had met his end to a group of adventurers exploring the rift. With now nothing holding him back, Ozma prepared his army for war. However, before he could leave his dimensional prison, he was stopped by the same group of adventurers. Although he was greatly weakened from his centuries long struggle with Michaela, Ozma fought against the adventurers, and he, too, met his inevitable end.
"In the end... I wonder... was Michaela right about me?
Does my death hasten the end of your world...? Answer me, Michaela...!!
Khazan... Ah, Khazan... This is hardly fair... You are the only one who could understand me...
No... Not... Like this...! Please... do not take me like this...!! Khazan..."- —— Ozma's final words

Although the Priest Order and the people of Arad celebrated the death of Ozma, heavy residual effects remained. The Imposters still remained. And in their blind pursuit to vanquish evil, they had caused the deaths of two more Apostles, bringing the prophecy of Arad's destruction closer to fruition.
Origin Version
Note: Following the Origin Update, the Black Crusade dungeon was removed from the Time Gate storyline. This revision removed the revelation that the Priest Order was not responsible for sealing away Ozma. Rather, it was the handiwork of a mysterious, powerful mage who could control Interdimensional Rifts. Additionally, the storyline of Once More Into the Breach became inaccessible, but the events still took place in the plot. However, in this iteration, Ozma did not die. Rather, according to his entry on DFU, he was rescued and taken away by Khazan at the last moment. From then on, it was perceived that Ozma had been sealed away by Khazan.
During the Season 6 Act 1. ASCENSION Update, it was revealed that a sect of the Grim Seekers led by Prophet Ezra sought to protect or resurrect the remaining Apostles in an attempt to defy the prophecy of New Genesis. One of these Apostles was Ozma. The organization dispatched two of its branch leaders, Rosenberg, the Gray and Mandarin, the White Flower, to the former battleground of Dark Side, Los Chest, to conduct a ritual to resurrect Khazan and weaken Ozma's seal. Although they were unsuccessful in reviving Khazan, it weakened Khazan's grasp on Ozma, and it created the opportunity for another organization, the Black Order, to fulfill this task.
Realizing that an ordinary human vessel could not contain the God of Extinction, the Black Order sought out the corpse of Khazan, which was hidden away as a relic, known as the Coffin of Extinction, by the Usir Order in the Fortress of Nemesis within the Exile Mountains. There, the Black Order unleashed an assault led by one of its three highest members, Devastar, the Pure, and successfully located the fortress and retrieved the Coffin.
Black Purgatory Revision
In the original story version, the Three Dark Knights, Astaroth, Berias, and Tiamat, were sealed alongside Ozma in the Otherverse. However, the Black Purgatory Update revised this plot point, now claiming that the Dark Knights had been sealed away in Los Chest by the Holy Five, with the exception of Astaroth. In order to break the seal on the Dark Side, the Black Order needed to recapture Los Chest and resurrect the Dark Knights with their respective Pure successor. But although the Empire, Priest Order, and Usir Order attempted to intervene, they were too late. With the Dark Knights assembled, the Black Order entered the Dark Side with the Coffin in hand, ready to awaken their master.
Ozma Raid Revision
Note: Prior to the Ozma Raid Update, DFU released a three-part story series called The Light That Chained the Darkness. The series details the events that transpired during the final battle of the Black Crusade, focusing on the fall of Elerinon, the battle of Dark Side, and the aftermath of the war. At the same time, it revised certain plot points. Firstly, it recontextualized the location of Dark Side. Originally, a demon stronghold in a barren wasteland, it was now the former Pell Los city Elerinon Castle. Secondly, the story filled in the plot hole that was created with the removal of the Black Crusade Dungeon. The one who sealed away Ozma was no longer the mysterious hooded mage, but now Michaela, who sealed away both the Castle with Ozma in it and the Dark Side respectively in a pocket dimension. Thirdly, it de-canonized the events that transpired during Once More Into the Breach. Additionally, it recontextualized Khazan's seal on Ozma. It was now a seal that utilized the Chains of Extinction and the powers of the Netherworld to restrain Ozma from breaking out of Michaela's seal. Finally, it changed Michaela's revelation as an Apostle, unveiling that Ozma was ultimately responsible for revealing the truth of Michaela's identity to the world, the cause of the current schism within the Priest Order.
According to the records of the Empire and Lemidia Chrysos, Ozma was trapped inside three seals. Two seals were created by Michaela: the first sealed away Ellerinon Castle, and the second sealed away Dark Side within a pocket dimension. The last seal was created by Khazan, which placed Ozma within a deep slumber. With the seal containing Dark Side undone, the Dark Knights scattered to undo the ward surrounding the Castle while the Black Order resurrected Khazan. In response, the Priest Order, De Los Empire, and Usir Order allied forces, split into three divisions to pursue and stop them, led by Lucille Redmayne, Judy Ringwood, and Adras Teia respectively. But although they were able to dispose of the Dark Knights, they were too late to prevent the seal's undoing and Khazan's resurrection.
With all the seals undone and Khazan's interference now gone, the resurrected God of Chaos watched in amusement from afar as his foes scrambled to storm the castle. Upon their arrival, he released a portion of his power and toyed with his enemies while remaining on his throne. Impressed by their vigor, Ozma unleashed his true power and released a burst of energy that caused all but one of his foes to falter, the "Refined Blade." Now in his true form, he and the Blade engaged in combat, until, ultimately, Ozma met his end.
Upon his defeat, Ozma unleashed a final burst of energy which destabilized the Dark Side as a voice bellowed in the wind:
"I may perish, but Chaos will remain.
Khazan... Are you... watching from the... Netherworld...?
Khazan...
My friend.
Watch me from the Netherworld in the gaping mouth of the red moon.
You were afraid that I was being used by he who looked down upon us from beyond the sky.
But... I didn't care, even from the beginning.
I didn't care, so long as I could let my chaos, my anger, swallow the empire and destroy the rest of humanity.
The only thing I have left is revenge."- —— Ozma's final words

Legacy
As the region crumbled and the gateway to the dimension began to close, the Allied Forces rushed to leave the Dark Side. Although the enemy was defeated and they were able to escape due to the sacrifice of Nilvas Gracia, Ozma's legacy of Chaos still lingered. Imposters still roamed the land, and the Curse of Blood still remained.
In the aftermath of the war, many of the participants fell victim to the effects of Ozma's curse, including the Empire's Crown Prince Van Frantz. Although attempts were made by Lemidia Basilica to alleviate the curse's effects, it was unable to prevent further tragedies from occurring. One such tragedy, the Tragedy in the Confessional, led to an escalation of the sectarian conflict between the diocese.
After Ozma's demise, the Empire secretly attempted to absorb Ozma's Apostle energies as they escaped the closing rift. But just as Judy Ringwood was about to absorb the energy, she was interrupted by Midnight Black, who sought to absorb the energy for himself to become the new god of chaos. However, he, too, was thwarted by a third party, Michaela of the Holy Eye, who sealed away Midnight Black and absorbed Ozma's Apostle energies to thwart the prophecy of New Genesis. However, Michaela was unable to purify Ozma's energies, and needed to seek extreme measures to purify them, which ultimately led to the events that transpired in the War of the Saints.
Plane: Chaos
Dungeon & Fighter Mobile
The First Berserker: Khazan
Personality
Overall
Relationships
Quotes
- "Khazan! My friend. Remember! It's not over yet! You must survive! I will surely find you! Khazan, Khazan!"
- "Am I the villain or are you?"
- "See what loathesome creatures you truly are."
- "Let chaos reign supreme!"
- "Ahh, this brings back memories... You did not have to come all this way you know. I was on my way to find all of you, I assure you. I suppose I should thank you for saving me the effort..." ~ Ozma confronting the Adventurers
- "You have done me quite a service, killing Michael as you did. As a token of my gratitude, if you leave now, I will not kill you. Oh my, you have that defiant look in your eyes. Just remember... I gave you a chance." ~ Ozma confronting the Adventurers again
- "In the end... I wonder... was Michael right about me? Does my death hasten the end of your world...? Answer me, Michael...!! Khazan... Ah, Khazan... This is hardly fair... You are the only one who could understand me... No... Not... Like this...! Please... do not take me like this...!! Khazan..." ~ Ozma defeated by the Adventurers Ozma's final words.
Related Pages
As an Enemy (Otherverse)
Ozma of Chaos |

- Type

- Ozma originally made his first boss debut inside of the Otherverse's Dark Side, this dungeon has been removed upon the Global Client's arrival of Season 6.
Dark Side Attacks & Guide
As an Enemy (Ozma Raid)
Phase 1 Move Set
Phase 2 Move Set
Berserk Mode
Tips & Strategy
Quotes (Raid)
Phase 1
Encounter
- ???
Chaos Chain
- ???
Chaos Eye
- "Open your eyes, or accept your death." (On cast)
Silence Orb
- "Accept your fate." (On cast)
- "There is no denying it." (Pattern end)
Punish & Save
- "I'll punish and save you."
Chaos's Judgment
- "I'll show you mercy, and save you from the chaos."
Pre-Transformation
- "Resistance is futile." (If Ozma's HP reaches 50%)
Transformation
- ???
Phase 2
Encounter
- ???
Chaos Sacrifice
- "Who wants to sacrifice themselves?"
Chaos Ripple
- "I hearby declare the end of this rotton world." (On cast)
Void Space
- "Do you still deny your own voice?"
Chaos's Test
- "Can you see the truth behind the illusion?."
Chaos Fragment
- I've been waiting an eternity for this moment."
Annihilator
- "Those who defy Chaos shall be destroyed!" (Beserk pattern failure or surviving Chaos's Test)
Final Strike
- "Foolish. The Blade refuses to hear the truth." (5% HP)
Defeat
- ???
Appearances
- Throne of Chaos (Dungeon) (Boss)
Notes
- Ozma of Chaos has a special conversation when fighting with Apostle Kasijas from the Summoner's Hired Summon: Conqueror Kasijas skill. An example video is shown here.
Trivia
Etymology
- The name Ozma is of Scandinavian origins given to girls that means God's Protection.
Concept
- His overall character motif takes inspiration from Mathias Cronqvist who would later become Vlad Tepes Dracula, the primary antagonist of the Castlevania franchise, and shares a few similarities to the Vampire Lord in which:
- They both originally started off as human in their past lives.
- Turned against all of humanity after losing a loved one.
- Both are incarnations of Chaos.
In-Game
- He is featured through flavor text upon his transformation on the Level 100 Heavy Armor set, Ruination: The Path to Hell.
- His You be the God of Destruction; I'll be the God of Chaos line appears in Black Shrine's Chamber of Secrets upon meeting certain requirements.
- During Ozma Raid, his Two Phase boss fights play out very similarly to two Capcom-related games:
- Phase 1 functions like Urizen's Enthroned state in the 2019 Devil May Cry 5 when being protected by a floating crystal.
- Phase 2 is somewhat identical with Lord Deimos, the final boss from the 1993 Dungeons & Dragons: Tower of Doom.
Miscellaneous
- Ozma's attire was first available for the Male Fighter in an older package called Apostle's Descendant Avatars, then later returned in Advent of Apostles for Male Gunner & Male Mage.
Gallery
Sprites
![]()


