Welcome to the DFO World Wiki. With many major updates since the release of DFO, many items are missing. Visit Item Database Project to learn more.
Please remember to click "show preview" before saving the page.
Thanks for the updated logo snafuPop!
Difference between revisions of "The Machine Revolution: Total War"
NoirGraves (talk | contribs) m |
NoirGraves (talk | contribs) m (→Gameplay & Progression) |
||
| Line 52: | Line 52: | ||
===Differences from Bakal Raid=== | ===Differences from Bakal Raid=== | ||
* Seven of the Fourteen Bosses introduced, do not appear in Total War. | * Seven of the Fourteen Bosses introduced, do not appear in Total War. | ||
| − | * Some dungeon areas are | + | * Some dungeon areas are omitted. |
* Hismar, Spirazzi and Skasa's attack patterns are vastly toned down and adjusted from their Raid versions | * Hismar, Spirazzi and Skasa's attack patterns are vastly toned down and adjusted from their Raid versions | ||
* Specific rewards cannot be obtained in Total War, but can only be accessed through Bakal Raid. | * Specific rewards cannot be obtained in Total War, but can only be accessed through Bakal Raid. | ||
| Line 61: | Line 61: | ||
{{Spawns|class=named|Rage Dragon Brute}} functions similarly to that of an Advancing Unit from [[Fiend War]], where he'll roam around throughout each of the zones in a clockwise or counterclockwise direction if going near Mid-Boss rooms and while he is easily avoidable, Brute can be considered to a hindrance during runs. Defeating him doesn't offer much of benefits, but it is one less Monster to deal with. | {{Spawns|class=named|Rage Dragon Brute}} functions similarly to that of an Advancing Unit from [[Fiend War]], where he'll roam around throughout each of the zones in a clockwise or counterclockwise direction if going near Mid-Boss rooms and while he is easily avoidable, Brute can be considered to a hindrance during runs. Defeating him doesn't offer much of benefits, but it is one less Monster to deal with. | ||
| − | Upon entering either one of these zones, you and party members will receive debuffs in the form of a '''Sphere Effect''' that only affects them during | + | Upon entering either one of these zones, you and party members will receive debuffs in the form of a '''Sphere Effect''' that only affects them either during Mid or Major Boss fights, which can be challenging. To remove these effects permanently, you have the option of defeating the Mid-Bosses (Rotund, Steitze and Swan) that are randomly located within the Palace zones' map layout. In choosing to do so, this can also benefit players by clearing out the zone full of mobs. |
| − | * ''' | + | * '''Berserk Dragon Sphere Effect:''' Increases incoming damage. |
| − | * ''' | + | * '''Death Dragon Sphere Effect:''' Lowered {{IconLink|Poison (Status)}} Tolerance. |
| − | * ''' | + | * '''Ice Dragon Sphere Effect:''' Lowered {{IconLink|Freeze (Status)}} Tolerance. |
====Dragon's Fury==== | ====Dragon's Fury==== | ||
Revision as of 15:43, 16 July 2023
| The Machine Revolution: Total War | |
|---|---|

| |
| Location | Ancient Empyrean - Sky's Wish Gate |
| Min. Level | 110 |
| Level | 110 |
| Monster Level | 140 |
| End Boss | |
Contents
Overview
The Machine Revolution: Total War (Korean: 기계 혁명 : 개전) is essentially a Guide Mode to the actual seventh raid in Dungeon Fighter Online, that's focused around Bakal, the King of Dragons. Your main goal is to infiltrate a more down-scaled version of Bakal's Palace entrance via Realm of the Cruel King of Dragons, and defeat all three of his Great Dragons, each of which are located within their own respective zones.
Dungeon Rules & Details
- Entry Requirements:
| Level Needed | Required |
Time Limit | Main Item Option Levels | Fatigue Point Cost | Weekly Entry Count | Weekly Reward Count | Availability |
|---|---|---|---|---|---|---|---|
| 110 | 34,308 | 35 Minutes | 60–65 | 0 | 3/3 | 1/1 | Opened from Thursday - Sunday |
- Entry/Reward Limit Count: Total War can be entered around three times a week, rewards are only claimed once if all three Dragon bosses are defeated before the time limit is up.
- Player Amount: 1 - 4 Players.
- Quest Needed: Clear the Act Quests [An Ace Up Our Sleeve] through [A Very Small Difference] to gain access to the Channel.
- Speak with either NPC Sarah Wane to create a Combat Lobby, or press Right Bracket (]) on your Keyboard to bring up the Party Search UI to join one. Once everything is fully prepared, you can interact with Commander Irine on the right side to begin the Subjugation Operation.
Restrictions
- Your Usable Consumable count is set to five, this can be restored through defeating either Named or Boss Monsters in whichever of the three zones you've entered in.
- Only 1
 Life Token is given, finding all three OP Packs will grant an extra Token, totaling up to 4.
 - Similar to Ozma Raid or Advanced Dungeons, your skill cooldowns remain intact if you die and resurrect.
- Just like Ispins, players can be auto-revived with 30% HP/MP whenever a major boss enters their second phase or is defeated.
- Since Total War shares the same rewards with Bakal Raid, clearing Total War for the week will lock you out from entering Bakal.
- The run is considered a failure if the time-limit exceeds 35 Minutes.
Gameplay & Progression
Differences from Bakal Raid
- Seven of the Fourteen Bosses introduced, do not appear in Total War.
- Some dungeon areas are omitted.
- Hismar, Spirazzi and Skasa's attack patterns are vastly toned down and adjusted from their Raid versions
- Specific rewards cannot be obtained in Total War, but can only be accessed through Bakal Raid.
Dragon Palaces & Sphere Effects
Outside the main entrance, there are three different color-coded 3x3 zones that you're able to traverse through at anytime of your own choosing which houses the Great Dragon Trio consisting of: Death Dragon Soul Palace (Spirazzi), Berserk Dragon's Destroyed Palace (Hismar), and Ice Dragon's Frozen Palace (Skasa).
![]() Rage Dragon Brute functions similarly to that of an Advancing Unit from Fiend War, where he'll roam around throughout each of the zones in a clockwise or counterclockwise direction if going near Mid-Boss rooms and while he is easily avoidable, Brute can be considered to a hindrance during runs. Defeating him doesn't offer much of benefits, but it is one less Monster to deal with.
Rage Dragon Brute functions similarly to that of an Advancing Unit from Fiend War, where he'll roam around throughout each of the zones in a clockwise or counterclockwise direction if going near Mid-Boss rooms and while he is easily avoidable, Brute can be considered to a hindrance during runs. Defeating him doesn't offer much of benefits, but it is one less Monster to deal with.
Upon entering either one of these zones, you and party members will receive debuffs in the form of a Sphere Effect that only affects them either during Mid or Major Boss fights, which can be challenging. To remove these effects permanently, you have the option of defeating the Mid-Bosses (Rotund, Steitze and Swan) that are randomly located within the Palace zones' map layout. In choosing to do so, this can also benefit players by clearing out the zone full of mobs.
- Berserk Dragon Sphere Effect: Increases incoming damage.
- Death Dragon Sphere Effect: Lowered
 Poison (Status) Tolerance.
 - Ice Dragon Sphere Effect: Lowered
 Freeze (Status) Tolerance.
Dragon's Fury
- At the beginning of Total War, two of the Great Dragons are randomly given a Level 1 Fury buff that increases their attack by +5%. Whenever Hismar, Spirazzi or Skasa are defeated regardless of which order, that fury is increased by one level each, being somewhat similar to The Meister's Laboratory's Functional Disorder that remains in effect permanently, until the run is completed.
- Fury Level 1: Berserk/Death/Ice Dragon Atk. +5%
- Fury Level 2: Berserk/Death/Ice Dragon Atk. +15%
- Fury Level 3: Berserk/Death/Ice Dragon Atk. +30% w/ Receiving incoming damage by 15%.
OP Packs
- Three Overpower Packs are randomly also placed within the three zones, as these too can be optionally retrieved and offers the following effects:
- Lv. 1: Additional party damage +3%
- Lv. 2: Additional party damage +5%
- Lv. 3: Additional party damage +10%
These Packs also increase your Usable ![]() Life Token count by 1 apiece.
Life Token count by 1 apiece.
Dungeons & Monsters
| Dungeon Name | Monster Level | Dungeon Mid-Bosses | Dungeon Bosses | |
|---|---|---|---|---|

|
Berserk Dragon's Destroyed Palace | 140 | ||

|
Ice Dragon's Frozen Palace | 140 | ||
| File:Death Dragon Soul Palace.png | Death Dragon Soul Palace | 140 |
Tales Exchange System (Machine Revolution)
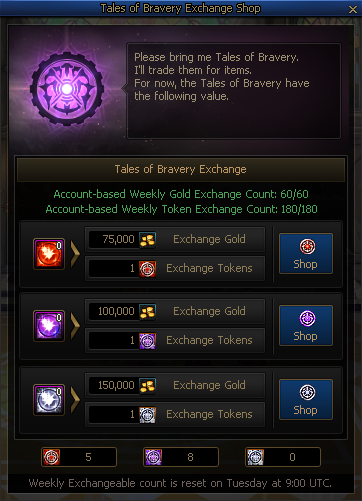
By interacting with either Rosa Jurgen or Magar's Holy Grail of Contradiction, players are eligible to exchange those ![]() Tales of Bravery - The Machine Revolution they've gathered into
Tales of Bravery - The Machine Revolution they've gathered into ![]() Conqueror's Token - The Machine Revolution for a total of 90 times per week. With those Tokens, items such as Level 105 Legendary or Epic Equipment Pots, Area Epic Boxes, various Enchanting Beads towards both Dealer/Buffer classes can be purchased, or sold for 250,000
Conqueror's Token - The Machine Revolution for a total of 90 times per week. With those Tokens, items such as Level 105 Legendary or Epic Equipment Pots, Area Epic Boxes, various Enchanting Beads towards both Dealer/Buffer classes can be purchased, or sold for 250,000 ![]() Gold each with its own separate limit.
Gold each with its own separate limit.
Do keep in mind that unused Tales of Braveries will expire on Tuesdays, and certain items may have monthly or weekly purchase limitations. Ispins and Archmage's Hall of Dimensions also share the same Token/Gold exchange system count.
Rewards
You'll receive the following rewards via Card Flips once all three Great Dragons are defeated:
- max-width:300px 100
- max-width:300px 100
- max-width:300px 100
- max-width:300px 100
- max-width:300px 100
- max-width:300px 100
- 3 - 6 Level 105 Epic Equipment Fixed Normal, Area or Custom Options (Levels 60 - 70)
Gold Card Flips may yield:
- Level 105 Sacrosanct Area Legendary Pot (Machine Revolution)
- Level 105 Dark Fragmented Abyss Unique Equipment
- max-width:300px 100
- max-width:300px 100
- 1 Unique or Legendary Machine Revolution Monster Card
Machine Revolution Fusion Equipment
Visit the Equipment Fusion page for more info regarding obtaining Equipment from this content.
