Welcome to the DFO World Wiki. With many major updates since the release of DFO, many items are missing. Visit Item Database Project to learn more.
Please remember to click "show preview" before saving the page.
Thanks for the updated logo snafuPop!
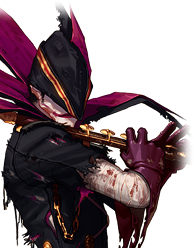
The Mad Piper
Peter the Mad Piper is the boss of Hamelin. He is a unique boss, in the sense that, after you defeat him, he will escape to another room to summon another mob of enemies. You have to kill him a total of 3 times to end the dungeon. He gains new attacks and more HP as he advances in phases.
Contents
Move List
All phases
- Projectile super-armor activated at all times.
- Attacks you at close range with his pipe. Has a wide Y-axis range.
- Plays his pipe and shoots musical notes at you as projectiles. Does physical damage and can freeze players hit by this.
- Plays his pipe and starts a timer above a random player (goes from 0 to 3). The targeted player will be attacked by a
 Rat Wave if he is still on the ground when the timer finishes.
Phase 2 Onwards
- Plays his pipe and summons groups of black rats as projectiles. Propagates outwards from him in all 8 directions and travels along the ground. These then continue to move around the screen slowly for a brief moment before dissipating.
Phase 3 Only
- Chorus of Madmen: This is one of the Mad Piper's most deadly attacks. Plays his pipe and covers the screen in a red hue. During the attack's duration, your attacks and your party members' attacks are able to hit and damage each other. Also boosts his defense for the duration of this attack.
- Plays his pipe and summons a pillar of rats as a temporary platform to lift him above the ground. The pillar can be attacked and destroyed. If you are within the vicinity, this attack will push you away from him. Once on top, he usually summons
 Rat Waves that move along the ground and attack you periodically.
 - Boss blow-back aura on get-up
- Summons
 Rathead Shu and
  Laksha. Only uses this at the start of the phase.
 - Summons
 Giant Rats and
  Biting Rats.
Strategy
Phase 1
- Fighting him the first two times shouldn't be too difficult, as he only uses his most powerful attacks in the final phase.
- The Mad Piper always spawns with a mob of
 Giant Rats and
  Biting Rats. Clear the room of these before focusing fire on him as these can cause major problems. They can poison or cause you to bleed on attack, and block your attacks (as they move hideously fast).
 - Characters with many projectiles may find it hard to stop the Mad Piper from closing in on them. Let your party members lure him away from you.
To avoid being hit by the timer attack, simply jump when the number above your head is 2, or jump slightly earlier.
Phase 2
- Avoid standing directly on his position if possible. His 8-directional projectile attack originates from the center of his sprite, meaning you will get hit by all 8 projectiles if he manages to use this attack while you are standing directly on him, dealing massive damage.
Phase 3
- Be EXTREMELY cautious once he casts Chorus of Madmen. Everyone in the party should immediately stop attacking and focus on avoiding his attacks instead. Damage is NOT scaled if you attacked by a teammate, so this could result in you killing your party members in a single hit, or worse, wiping out all of your teammates with a powerful AoE attack. Let only one character attack The Mad Piper at this point in the battle to minimize accidental friendly fire. The lower his health, the more he will use Chorus of Madmen.
- However, if you are soloing him, just continue fighting him normally as this won't affect you at all.
Appearances
- Secret Village (Boss)
- Hamelin (Boss)

